Table of Contents
ToggleIntroduction
In previous article, we share different types of fittings for pex pipe connections. In the coming articles we will share the installstion for different pex pipe fittings. Below we will mainly share about the pex sliding fittings, and pex crimp fittings, pex expansion fittings and pex push fit / push in fittings.

Installation guidelines for pex sliding fittings.
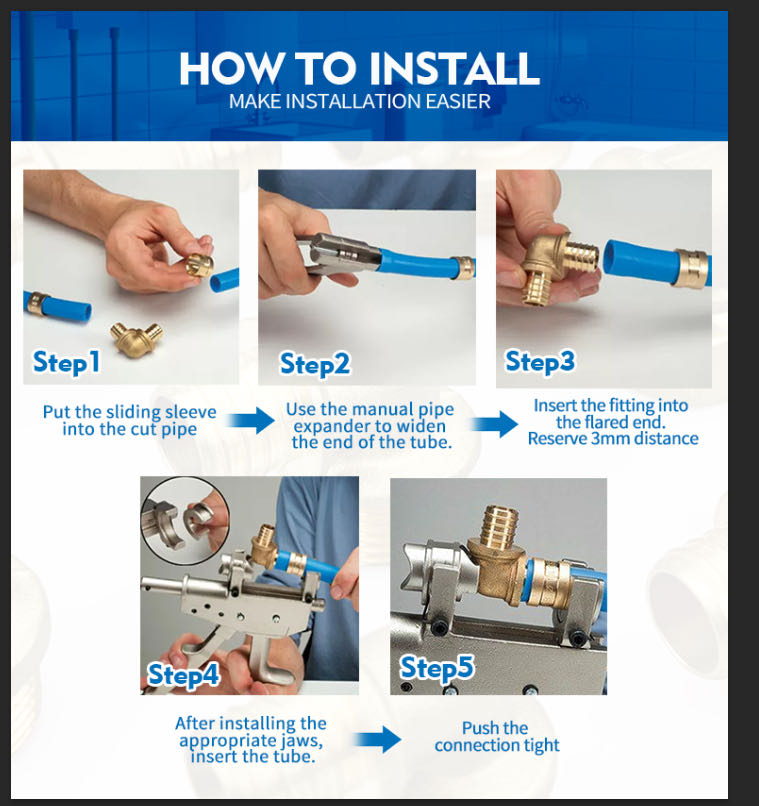
pex sliding fittings tool
1. Installation tools:
Pipe cutter, pex pipe expander, pex sliding press tool.
2. Install step by step:
Firstly cut the pipe as the length you need, then
Step 1, Put the sliding sleeve / brass ring into the cut pipe.
Step 2, Use the manual pipe expander to widen the end of the tube.
Step 3, Insert the fitting into the flared end. Reserve 3mm distance.
Step 4, After installing the appropriate jaws, insert the tube.
Step 5, Push the connection tight.
Installation guidelines for pex crimp fittings and clamp fittings

pex pipe connection
Step 1, Cutter the pipe.
Step 2, Put the crimp ring into the pex pipe, to the end distance about 1/8” to 1/4”.
Step 3, Use the crimp tool to press and tighten the crimp ring.
Step 4, Use the guage to test whether the ring is pressed well.
So it’s very easy for the crimp fittings installation. But their standard is American F1807, which pipe size in inch. For example, 1/2” pex pipe, 3/4” pex pipe and 1” pex pipe. The installation for clamp/pinch fittings is smilar to the crimp fittings. You can see details in below picture.

pex installation
Step 1, Cut Pex tubing square, then remove the burrs, ensuring a clean, even edge
Step 2, Slip the stainless steel cinch clamps over the tubing, then slip tubing onto insert fittings.
Step 3, Close the clamp ear with cinch tool. The tool will auto release until the clamp is fully engaged.
Step 4, Before use, please inspect tubing and make pressure test. Cut and remove the clamp ring then repeat the total procedure if any leaks. There will be a slightly gap after crimping. Some springback is normal.
Installation guidelines for pex expansion fittings
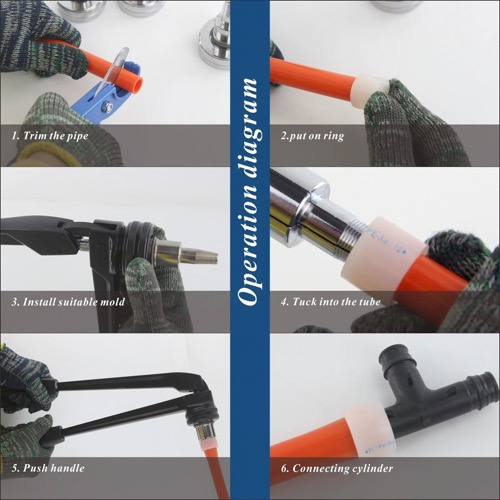
expansion fittings
Step 1, Cut Pex tubing square, then remove the burrs, ensuring a clean, even edge.
Step 2, Put the PEX A ring onto the pex pipe.
Step 3, Intall suitable mold on the expansion tool.
Step 4, Tuck the tool into the tube.
Step 5, Push the tool handle to expand the pex pipe and the pex ring.
Step 6, Connecting the fittings into the pipe
About the installation for pex press fittings and pex compression fittings, you can go to our previous article How to Install PEX-AL-PEX Gas Pipes: Step-by-Step Instructions.
The inatallation for Pex push in fittings
The last one we want to share the inatallation for Pex push in fittings, which is easier than other pex plumbing fittings.
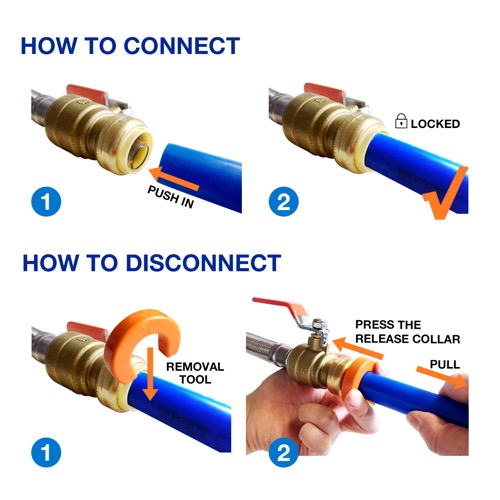
push fit fittings
Step1, Cut the pipe square
Step 2, Push the pex tube into the push fit fittings( sharkbite fittings).
If you want to disconnect, the push in fitting can be removed by the key tool. As picture show, just press the key then pull the pipe.
The importance for konw the installation method for the pex pipe connection
Knowing the correct method of installation for PEX pipe connections is crucial for several reasons. Here are some of the key points highlighting its importance:
Safety: The first and foremost reason is safety. The incorrect installation of gas or water pipes can lead to harmful accidents like leaks, which can cause serious damage to property and in certain instances, can pose health risks. Correct installation ensures that gas and water lines operate safely within your home or building.
Efficiency: Properly installed PEX pipes will deliver water or gas more efficiently. An incorrect connection can lead to leaks and wastage of valuable resources. The right installation technique ensures optimum pressure and flow.
Durability: Incorrect installation can lead to premature failure of the system. It can create stress points that lead to cracks, leaks, and eventually, pipe failure. Correct installation contributes to the longevity of the PEX plumbing system.
Cost-Effective: Avoiding mistakes during the initial installation can save a lot of money over time. Repeatedly fixing leaks or replacing pipes can add up in terms of time, effort, and money.
Code Compliance: In many places, plumbing installations must comply with specific codes and standards. Knowing and correctly implementing the installation method ensures you meet these requirements.
Peace of Mind: When you know that the PEX pipe connections are installed correctly, it gives you peace of mind knowing that your plumbing or gas system is secure, efficient, and long-lasting.
Given these points, it's clear that correct knowledge and implementation of PEX pipe connection installation is an absolute necessity. Therefore, whether you are a professional installer or a DIY homeowner, a thorough understanding of the installation process can go a long way in ensuring a safe and efficient plumbing system.
Conclution
PEX Sliding Fittings: Installation of these fittings is straightforward. It involves making a cut on the PEX tubing, inserting the fitting in, and then pushing until it fits snuggly. This process eliminates the need for professional-grade tools and helps you save time.
PEX Crimp Fittings: Crimp fittings require a more complicated process. A ring is placed over the PEX tubing, then the fitting is inserted. Once installed, the ring is crimped, using a specific tool, around the tubing to secure it. The crimp system is secure and leak-proof when done correctly, and it can be used in both exposed and hidden locations like walls, floors, and ceilings. However, it does require some training to get it right, and it needs a specific crimping tool.
PEX Expanding Fittings: These are one of the most reliable types of PEX fittings. During the installation, an expansion tool is used to expand the end of the PEX tube, the fitting is inserted, and then the tube contracts for a secure fit. This system creates a tight, leak-proof connection that can withstand high pressure and temperature fluctuations. However, like crimp fittings, it requires special tools (an expansion tool) and some training to do correctly.
Push-in fittings can be installed quickly and easily with no tools required. You simply push the tube into the fitting until it "clicks" into place - hence why they're often referred to as "push-to-connect".
Because no special tools or soldering are needed, the installation process is usually faster than it is with other types of fittings. This is particularly beneficial in larger installation projects where time is a factor. But the push in fittings price is the highest. And they may not be suitable for all situations, such as in hidden plumbing systems within walls or underground because regular visual checks are required to ensure they are functioning properly.
Always consider the specific requirements, zoning laws and market standard of your project before choosing your fittings.


